Simplifying WebGL: Building an Effective Layout Engine
Step-by-step guide to build a layout engine for WebGL (Pixi JS) using JavaScript and TypeScript. An alternative to Yoga layout / Stretch layout.

I'm a Software engineer by profession. I'm also a privacy advocate and self-hosting enthusiast. Whenever possible, I try to document my experiences on my personal blog, over on abhinavdabral.com.
As front-end engineers, we often don't have to think about everything that the browser is doing behind the scenes to make our lives easier.
You put two
divtogether, they get stacked automatically.They grow in size as you add content to them.
You can style them, change alignments and whatnot.
The logic that's handling all this is your browser's layout engine (along with a lot of other things).
But when we're using WebGL, everything has to be individually positioned and their dimensions have to be predefined as well. So, if we want to get an HTML-like experience within WebGL, that is, relative positioning between objects; we require a layout engine. A layout engine will help in dynamically allocating and calculating the position and dimensions of relatively positioned objects within WebGL.
What is a Layout Engine?
In this context, we're referring to a piece of logic that is responsible for handling the logistics of where something should be positioned, relative to the position of others.
Even this practical guide is using WebGL as a most common use case but the approach is not specific to WebGL. It can be used in other use cases with similar requirements.
Option 1 - Find something that "just works"
Your best bet is to find something purpose-built for this exact use case. How well it integrates with your specific project, is another thing.
Here are a couple of options:
Yoga layout - https://github.com/facebook/yoga (C++)
This is what React Native uses internally. That's how you can write CSS-like styles and they work nearly identically on iOS and Android.
Stretch layout - https://github.com/vislyhq/stretch (Rust)
Pixi Layout - https://github.com/pixijs/layout (JS)
And a few others (which have not been updated for a while)
https://github.com/lynaghk/subform-layout (Abandoned, also only minified code is available)
Unfortunately, for our use case (and without getting into details), none of those worked as we expected.
Maybe you're in the same situation as us, or you just want something small and don't want to use these big libraries, either way, I hope you will find something useful in this article.
Option 2 - Learn how a layout engine works
There's no point in putting these details here, especially because Matt Brubeck has done a far better job at highlighting all the important bits that someone building a layout engine should know.
Here's the link - https://limpet.net/mbrubeck/2014/08/08/toy-layout-engine-1.html
While his approach was more towards building an HTML rendering engine, the core design of the layout engine stays more or less the same.
Building a layout engine in Javascript
Please note that this is not a one-size-fits-all solution. This is more of a "proof-of-concept" than anything else. Here, we're merely trying to highlight the process that goes into building a very basic layout engine, so that one can learn from it and build their implementation, for their specific use-case. You can make this as simple as needed or as complicated as needed.
1. Plan
Before we start the implementation, let's just go over what we plan to achieve and how we plan to achieve it.
The process from start to finish goes somewhat like this:
Define - Have all the nodes with styles in them, arranged in a proper hierarchy. This will be the tree structure and the top-mode node will be called the
rootNodeCompute - Start computing layouts from the
rootNode, and recursively calculate for the entire tree.Paint - Start from the
rootNodeand recursively go over all children.
2. Implementation
These are the items we'll be implementing here
Allocator (class)
An Allocator is a singleton, responsible for handling all the operations of adding/removing nodes.
Box (class)
The Box will be a visual element. It'll just use the calculated data from the
nodeto position and shape itself accordingly.Test environment
To test everything.
Layout calculator (function)
A recursive function that will calculate the layout for the given node (and its children) recursively.
2.1 - Allocator
2.1.1 - Define the shape of Node
Nodes are a logical structure that we will use to represent any element during the entire process. Node doesn't need to know about what kind of element it is representing. An element can be whatever you want it to be - Box, Text, anything. But they all still have to be linked to their own individual "node" which will represent them during the layout process.
A node can contain information like:
Externally supplied style to this element
Layout parameters of the element
For our use case, let's say that the node is defined by the following TypeScript types:
// layoutEngine.ts

type NodeLayout = {
  id: string; // unique ID
  width: number; // computed
  height: number; // computed
  x: number; // computed
  y: number; // computed
  style: NodeStyle; // externally supplied styles
  children: Array<NodeLayout>; // in order
  parentNode: NodeLayout | null; // because root will have `null`
}

type NodeStyle = {
  width?: number;
  height?: number;
  layoutMode: LayoutMode
}

enum LayoutMode {
  HORIZONTAL = "horizontal",
  VERTICAL = "vertical"
}
2.1.2 - Create the Allocator
An Allocator singleton class will be responsible for managing all the operations of adding nodes to other nodes and forming a tree.
// allocator.ts

class Allocator {
  public rootNode = createNode(); // Wait what?
  // .. other methods will go here
}
Oh yes, we also need a function that will help us create a node initializer. Nothing too complicated.
// allocator.ts

const defaultStyle: NodeStyle = {
  layoutMode: LayoutMode.VERTICAL,
  backgroundColor: 0x000000
};

/**
 * Creates and returns a NodeLayout object with
 * default values assigned to it.
 */
export const createNode = () => {
  const newNode: NodeLayout = {
    id: uuid(),
    width: 0,
    height: 0,
    x: 0,
    y: 0,
    style: defaultStyle,
    children: [],
    parentNode: null
  };
  return newNode;
};
Now that, we've taken care of that, let's get back to our singleton.
Now we need a way to:
Attach new nodes to existing nodes
  attachChild(child: NodeLayout, parent?: NodeLayout) {
    const finalParent = parent || this.rootNode;
    finalParent.children.push(child);
    child.parentNode = finalParent;
  }
Detach nodes from existing nodes
  detachChild(child: NodeLayout) {
    child.parentNode.children = child.parentNode.children.filter(
      (c) => c.id !== child.id
    );
    child.parentNode = null;
  }
Move nodes between nodes
  moveChild(child: NodeLayout, parent: NodeLayout) {
    this.detachChild(child);
    this.attachChild(child, parent);
  }
and Destroy the nodes, recursively.
  destroy(node: NodeLayout) {
    node.children.forEach((child) => this.destroy(child));
    this.detachChild(node);
  }
That's it. Now the only thing left to do is, actually instantiate it as a singleton and export it.
// allocator.ts

export const defaultAllocator = new Allocator();
2.2 - Box, the visual component
Again, this is just a POC, so we'll go as simple as possible. For any element, in this case, Box, we'll just have a class that will contain an instance of a NodeLayout, and then the rest of the implementation is only around how the box renders and everything else involved with it.
For the sake of our example, we're going with Pixi JS to create this box. But this can be whatever else it needs to be. The important part is how we consume the data of the node to render the box.
// Box.ts

import { createNode } from "./allocator";
import { NodeLayout, NodeStyle } from "./layoutEngine";
import * as PIXI from "pixi.js";

export class Box {
  node: NodeLayout = createNode();
  container: PIXI.Graphics = new PIXI.Graphics();

  constructor(style?: Partial<NodeStyle>) {
    this.node.style = { ...this.node.style, ...style };
  }

  render() {
    this.container.clear();
    this.container.beginFill(this.node.style.backgroundColor);

    this.container.lineStyle(1, 0x000000);
    this.container.drawRect(
      this.node.x,
      this.node.y,
      Number(this.node.width),
      Number(this.node.height)
    );

    this.container.endFill();
  }
}
2.3 - Sandbox
Just to check if everything is in order so far, we'll just create a sandbox environment to test things out. We'll be using Pixi JS here.
// app.ts or index.ts

import * as PIXI from "pixi.js";
import { defaultAllocator } from "./allocator";
import { Box } from "./Box";
import { calculateLayout, LayoutMode } from "./layoutEngine";

function initApp(container: HTMLElement) {
  const app = new PIXI.Application({
    resizeTo: container
  });

  container.appendChild((app.view as unknown) as HTMLCanvasElement);

  //// Sample code Start ////

  // initialize a Box with Red background
  const b1 = new Box({
    backgroundColor: 0xff0000
  });

  // we need to add the PIXI component to the main stage
  app.stage.addChild(b1.container);

  // And let's just assign some values to node
  // these values will actually be computed automatically
  // when we have calculateLayout in place
  b1.node = {
    ...b1.node,
    x: 20,
    y: 20,
    width: 100,
    height: 100
  };

  // finally call the render method to pain the box
  b1.render();
  //// Sample code End ////

}

const htmlContainer = document.getElementById("app");
if (htmlContainer) {
  initApp(htmlContainer);
}
At this stage, you should get something like this:
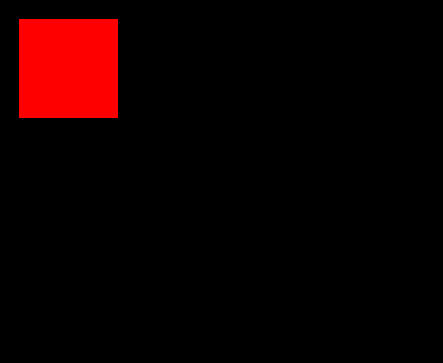
Yay, a red rectangle on the screen.
The setup is all complete and only the last piece remains, which is what binds this whole thing together (and the whole point of this article). It was necessary to have everything else in place because layout computation is something that you'd likely want to experiment around and experimentation is fun when you can visually see the change happening as you do it.
2.4 - Layout computation
When we talk about layout engines, it mostly comes down to calculating the x, y, width and height of a node. It sounds simple enough but the key is doing calculations in a particular sequence to get it right.
Layout calculation process and implementation
Computation starts at the given node (
rootNodefor the very first iteration)// layoutEngine.ts function calculateLayout(node: NodeLayout) { const parent = node.parentNode; // what now? }Calculate
width,xandyof this nodeLet's check if the parent is not there. This means this is likely the root node. so we just define some variables as defaults for the root node.
   ...
   if (!parent) {
     // this is a root node
     node.width = originLayout.width;
     node.x = originLayout.x;
     node.y = originLayout.y;
   }
If a parent is present, then we need to check for whether the parent is laying the children Horizontally or Vertically.
 ...
 else {
     const currentNodeIndex = parent.children.findIndex(
       (n) => n.id === node.id
     );

     // Somethings are dictated by previous sibling,
     // we let's have it ready
     const previousSibling =
       currentNodeIndex > 0
         ? parent.children[currentNodeIndex - 1]
         : null;

     // If the parent is laying out components vertically
     if (parent.style.layoutMode === LayoutMode.VERTICAL) {
       node.width = parent.width; // deduct padding/margin here
       node.x = parent.x; // add padding/margin here

       const siblingBottom = previousSibling
         ? previousSibling.y + previousSibling.height
         : 0;

       if (siblingBottom && previousSibling) {
         // if sibling starts at 0, ends at 200,
         // this starts at 201.
         node.y = siblingBottom + 1;
         // Also consider adding margins here.
       } else {
         node.y = parent.y; // add margins here
       }
     }

     // If the parent is layout out components horizontally
     else {
       const availableWidth = parent.width; // deduct paddings

       // we're going lazy here but ideally you can have the
       // logic to propotionally divide the available width among
       // the children.
       node.width = availableWidth / parent.children.length;

       node.y = parent.y; // Addings padding/margins here

       const siblingLeft = previousSibling
         ? previousSibling.x + previousSibling.width
         : 0;

       if (previousSibling && siblingLeft) {
         node.x = siblingLeft + 1; // add margins
       } else {
         node.x = parent.x; // add padding/margins here
       }
     }
   }
Finally, let's just set the width equal to that from the
style, if it is configuredif (node.style.width) { node.width = node.style.width; }
Start calculating the layout for the children, recursively
(i.e. start from #1 of this process)
node.children.forEach(calculateLayout);Calculate
heightof this node
(This is done after computing the layout for the children because height is affected by the children)// Case 1: When height is already defined if (node.style.height) { node.height = node.style.height; } // Case 2: If the current node is laying the children vertically else if (node.style.layoutMode === LayoutMode.VERTICAL) { // then the total height is just the total height of all // the children (and their margins/paddings) /** * get the maximum height by computing difference between y of * first node and the y of last node, and add the height of * the last node. * Also add the padding of the parent node and margins of * first and last child */ if (node.children.length >= 1) { const firstChild = node.children[0]; const lastChild = node.children[node.children.length - 1]; node.height = lastChild.y + lastChild.height - firstChild.y; } else { node.height = 0; } } // Case 3: If the current node is laying children horizontally else { // Just find the node that has the largest height node.height = Math.max(...node.children.map((c) => c.height)); }Done
2.5 - Let's try it
To test this out, we just need to go back to the sandbox environment and set up a set of Box components.
For this test, we'll do something like this
b1 (default vertical mode)
|- b11 (horizontal mode) - Yellow
|  |- b111 - Red
|  |- b112 - Orange
|  |- b113 - Magenta
|- b12 (vertical mode) - Aqua
|  |- b121 - Green
|  |- b122 - Dark green
|  |- b123 - Dark blue
To implement this, let's go back to our sandbox, replace all the sample code and implement this as follows:
Add the box b1
const b1 = new Box();Add 2 boxes b11 and b12
  const b11 = new Box({
     layoutMode: LayoutMode.HORIZONTAL,
     backgroundColor: 0xffff00 // yellow
   });

   const b12 = new Box({
     backgroundColor: 0x00ffff // aqua
   });
Add 6 boxes (3 for b11 and 3 for b12)
 // FOR b11
   const b111 = new Box({
     width: 100,
     height: 100,
     backgroundColor: 0xff0000 // red
   });
   const b112 = new Box({
     width: 120,
     height: 120,
     backgroundColor: 0xffaa00 // orange
   });
   const b113 = new Box({
     width: 80,
     height: 80,
     backgroundColor: 0xcc00ff // magenta
   });

 // FOR b12
   const b121 = new Box({
     height: 100,
     backgroundColor: 0x00ff00 // green
   });
   const b122 = new Box({
     width: 200,
     height: 120,
     backgroundColor: 0x00cc00 // dark green
   });
   const b123 = new Box({
     height: 80,
     backgroundColor: 0x0000cc // dark blue
   });
Put everything within the allocator so that it forms a tree
   // Add b1 to the root
   defaultAllocator.attachChild(b1.node, defaultAllocator.rootNode);

   // Add b11 and b12 as b1's children
   defaultAllocator.attachChild(b11.node, b1.node);
   defaultAllocator.attachChild(b12.node, b1.node);

   // add 3 children b111, b112, b113 within b11
   defaultAllocator.attachChild(b111.node, b11.node);
   defaultAllocator.attachChild(b112.node, b11.node);
   defaultAllocator.attachChild(b113.node, b11.node);

   // add 3 children b121, b122, b123 within b12
   defaultAllocator.attachChild(b121.node, b12.node);
   defaultAllocator.attachChild(b122.node, b12.node);
   defaultAllocator.attachChild(b123.node, b12.node);
Create an array of all the elements and just attach them to the Pixi Stage.
Still, nothing will be rendered at this point.const components = [ b1, b11, b12, b111, b112, b113, b121, b122, b123 ]; components.forEach((c) => app.stage.addChild(c.container));Compute the layout and render the nodes
 calculateLayout(defaultAllocator.rootNode);

 components.forEach((c) => {
   c.render();
 });
Done. If everything so far was correctly done, you should see something like this.

Wait ... it's not over
The article was more aimed at keeping things as simple as possible to understand the basics of a layout engine. But there's no need to stop here. This can be taken as an opportunity to challenge yourself and implement more things on top of this implementation, such as:
Alignment (both horizontal and vertical)
Paddings and Margins
Flexible widths of children based on proportions
CodeSandbox
This entire example is also available on CodeSandbox if you'd like to fork it there and experiment with it - https://codesandbox.io/s/layout-engine-demo-3y3hjf
Join us
We're always looking to expand and welcome talented members to our team. And the best part, it's all remote! You can work from wherever you are. Head over to our careers page and apply to any of the available positions that seem right for you.